Taking screenshots is a common practice for saving important information, sharing content, or capturing memorable moments. However, there are times when you need to capture more than just what’s visible on your screen at a moment’s glance. To capture entire pages, especially when dealing with long or scrolling content, you’ll need to know how to take screenshots that can scroll and capture everything from top to bottom. Fortunately, both Windows and Mac users, as well as mobile device owners, have several tools and techniques available for taking full-page screenshots. In this guide, we’ll walk you through different methods for taking a screenshot and capturing entire pages by scrolling, ensuring you don’t miss a single detail.
Understanding Scrolling Screenshots
A scrolling screenshot allows you to capture the entirety of a webpage or document, even beyond the visible screen area. It’s incredibly useful for long web pages, chats, or lengthy articles. Traditional screenshots only capture the content displayed on the screen at the moment, leaving out anything hidden from view. With a scrolling screenshot, you get the complete picture, which is great for saving content or sharing information. Many modern devices and apps offer built-in tools for this, so you no longer need to use multiple screenshots.
Taking a Scrolling Screenshot on Windows
On Windows, you can take a full-page screenshot of a webpage using built-in features and third-party tools. The Snipping Tool or Snip & Sketch doesn’t support scrolling screenshots, but third-party apps like ShareX and PicPick do. ShareX, for instance, offers a “Scrolling Capture” mode that lets you select a region to capture and scroll through the page. Once the page is captured, you can save the image as a file. By using ShareX or other similar tools, you can efficiently capture a whole webpage with just a few clicks.
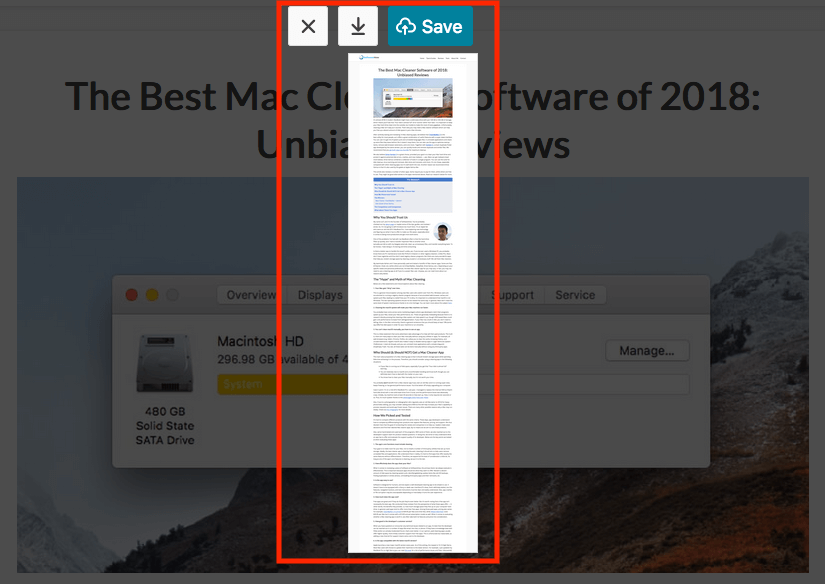
Taking a Scrolling Screenshot on Mac
For Mac users, taking scrolling screenshots can be achieved with built-in macOS tools or third-party apps. macOS doesn’t natively support scrolling screenshots, but apps like Snagit and CleanShot X can be extremely helpful. Snagit, for example, allows you to capture entire scrolling windows by choosing the “Scrolling Window” option. This feature lets you scroll through the page while Snagit automatically captures the full content. It’s a user-friendly solution that delivers excellent results without much effort.
Using Chrome Extensions for Scrolling Screenshots
If you’re working on a web page, using a Chrome extension is one of the easiest ways to capture a scrolling screenshot. Extensions like Full Page Screen Capture or Fireshot are designed specifically for this purpose. Once installed, these extensions let you click a button and automatically capture the entire page, including everything hidden below the fold. The captured screenshot can then be saved as an image or PDF. This is an efficient option for anyone who needs to take scrolling screenshots of webpages in particular.
Using Mobile Devices to Capture Full Pages
Smartphones and tablets also offer solutions for capturing entire pages. On Android, you can use the native screenshot tool by holding the power and volume down buttons simultaneously. After taking a regular screenshot, you’ll see an option to “Scroll” and capture the rest of the page. On iPhones, you can use the native screenshot feature and select the “Full Page” option in Safari. This allows you to capture an entire webpage, even if it requires scrolling.
Vote
Who is your all-time favorite president?
Adjusting Your Browser’s Zoom Level
Sometimes, taking a full-page screenshot requires tweaking your zoom level. If you’re working with a webpage, adjusting the zoom on your browser can help you fit more content into the visible window. By reducing the zoom, you can ensure that more of the page is visible, making it easier to capture it in a single screenshot. This trick is particularly useful when you don’t want to use additional tools or apps. Just keep in mind that reducing the zoom may affect readability, so adjust it based on your needs.
Saving and Editing Scrolling Screenshots
Once you’ve captured your scrolling screenshot, you may want to edit or annotate it. Both Snagit and ShareX offer editing tools that allow you to crop, highlight, or add text to the screenshot. After editing, you can save the image in various formats such as PNG, JPG, or PDF. For mobile users, apps like Adobe Photoshop Express or Markup (for iOS) provide editing features to enhance your screenshots. Editing tools make it easy to create professional-looking screenshots for work or personal use.
Sharing Your Scrolling Screenshots
Sharing scrolling screenshots is simple once you’ve captured them. For Windows and Mac users, you can upload the images to cloud storage services like Google Drive or Dropbox and share a link. Mobile users can easily share their screenshots via messaging apps, social media, or email. It’s also possible to send screenshots directly from apps like Snagit and ShareX through their built-in sharing features. Sharing is made simple with various cloud services and messaging tools, ensuring your screenshots reach the intended audience quickly.
Avoiding Common Errors with Scrolling Screenshots
While capturing scrolling screenshots is convenient, there are common mistakes you should avoid. For example, on mobile devices, if you take a screenshot too quickly, the scroll option might not appear. Additionally, when using third-party tools, you may forget to set the correct capture area, resulting in incomplete screenshots. To avoid these errors, always double-check your settings before capturing the screenshot. Taking the time to ensure the process runs smoothly will guarantee better results and fewer frustrations.
Organizing Your Screenshots
After taking multiple scrolling screenshots, it’s important to keep them organized. Create folders on your device to store images by category or project. You can also rename your screenshots to make them easier to search. Using cloud storage services like Google Photos or OneDrive provides an easy way to organize and access your screenshots from multiple devices. With good organization, you can quickly find any screenshot whenever you need it.
Best Tools for Capturing Scrolling Screenshots
- ShareX (Windows)
- Snagit (Mac)
- Full Page Screen Capture (Chrome Extension)
- Fireshot (Chrome Extension)
- Adobe Photoshop Express (Mobile)
- CleanShot X (Mac)
- Screenshot Easy (Android)
Watch Live Sports Now!
Dont miss a single moment of your favorite sports. Tune in to live matches, exclusive coverage, and expert analysis.
Start watching top-tier sports action now!
Watch NowQuick Tips for Better Scrolling Screenshots
- Use a smaller zoom level to capture more of the page.
- Try to avoid ads that might appear in screenshots.
- Use a full-screen mode in your browser for better results.
- Choose a screenshot tool with editing features for better clarity.
- Organize your screenshots in cloud storage for easy access.
- Avoid taking screenshots too quickly to ensure smooth scrolling.
- Double-check your screenshot before sharing to make sure it’s complete.
Pro Tip: Adjust the zoom level on your browser before capturing a scrolling screenshot to fit more content into the visible screen area, ensuring you capture everything at once.
| Tool | Platform | Key Benefit |
|---|---|---|
| Snagit | Mac, Windows | Advanced editing and scrolling capture |
| Full Page Screen Capture | Chrome | Simple, one-click full-page capture |
| Screenshot Easy | Android | Quick scrolling capture for long webpages |
“A well-captured screenshot can save time, share knowledge, and preserve important information for future use.”
Now that you know the steps for taking scrolling screenshots, you can easily capture entire pages without missing a detail. Try out the tools and techniques discussed in this guide and find the one that best suits your needs. Whether you’re a professional sharing reports or simply capturing a webpage for later reference, this method will save you time and effort. Share this article with friends who could use these tips and bookmark it for future use. Happy screenshotting!