Making your own jam at home is not only rewarding but also allows you to savor the fresh, vibrant flavors of fruit in their purest form. Whether you’re using berries, stone fruits, or tropical varieties, homemade jam is a versatile treat that can be spread on toast, added to desserts, or enjoyed as a topping for pancakes. The process is simple yet precise, combining the right balance of sugar, fruit, and pectin to achieve that perfect texture. Plus, it’s a great way to preserve the bounty of seasonal fruits, so you can enjoy them year-round. Let’s explore the step-by-step guide to making your own delicious homemade jam.
Choosing the Right Fruit
The first step in making jam is selecting the right fruit. You want to use fresh, ripe fruit that is full of flavor, as this will form the base of your jam. Berries like strawberries, raspberries, or blueberries are popular choices, but you can also use peaches, apricots, or even exotic fruits like mangoes. Make sure the fruit is ripe but not overripe, as overripe fruit may lead to a jam that is too runny. Using organic fruit is an excellent option if you prefer to avoid pesticides and chemicals in your jam.
Preparing the Fruit
Once you’ve selected your fruit, it’s time to prepare it for jam-making. Wash the fruit thoroughly to remove any dirt or residue, and remove any stems, pits, or seeds. For smaller fruits like berries, you can leave them whole or mash them slightly depending on the texture you prefer. For larger fruits, like peaches or apples, peel and chop them into smaller pieces for easy cooking. Make sure the fruit is cut evenly, as this helps it cook uniformly and ensures that the jam will set correctly.
The Role of Sugar in Jam Making
Sugar plays a crucial role in jam-making, as it helps with both the preservation and setting of the jam. The sugar draws out the natural juices from the fruit, helping to form the syrupy consistency that defines jam. Typically, the ratio of sugar to fruit is about 1:1, but this can vary depending on the sweetness of the fruit. Adjust the sugar level based on personal taste—you can reduce the sugar slightly for a less sweet jam, but be cautious, as too little sugar may prevent the jam from setting properly. Don’t skip the sugar if you want a jam with the right texture and shelf life.
The Importance of Pectin
Pectin is a natural substance found in fruits that helps jam to thicken and set. Some fruits, such as apples and citrus, are naturally high in pectin, while others, like strawberries, have less. If your chosen fruit is low in pectin, you’ll need to add commercial pectin or a pectin-rich fruit like apples to help the jam set. Commercial pectin is available in both liquid and powdered forms, and you can find recipes for both types. Don’t forget to check the instructions on your pectin packet to ensure you use the right amount for your batch.
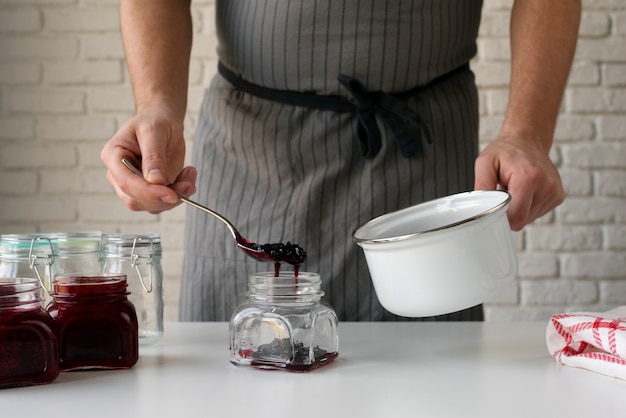
Cooking the Jam
Once your fruit, sugar, and pectin are ready, it’s time to cook the jam. In a large, heavy-bottomed pot, combine the fruit and sugar, and bring the mixture to a boil. Stir the mixture frequently to prevent burning and to help dissolve the sugar. After it reaches a rolling boil, continue cooking it at a high heat for about 10-15 minutes, or until the jam reaches the desired consistency. You can test the jam by placing a spoonful on a cold plate and checking if it wrinkles when you run your finger through it. Be patient during this step, as the cooking time is essential for achieving the perfect texture.
Vote
Who is your all-time favorite president?
Testing the Jam’s Consistency
One of the most important steps in making jam is testing its consistency to ensure it will set properly. After boiling, use the cold plate method to check the jam. Simply drop a small spoonful of jam onto a cold plate and let it sit for a minute. Then, tilt the plate—if the jam runs or is too thin, continue boiling for a few more minutes. If the jam wrinkles when pushed with your finger, it’s ready to be removed from the heat. Be sure to test multiple times as the jam can change texture quickly.
Canning and Preserving the Jam
Once the jam is ready, it’s time to preserve it. Sterilize your jars and lids by boiling them or placing them in the oven at 180°F (82°C) for 10-15 minutes. Carefully ladle the hot jam into the sterilized jars, leaving about half an inch of space at the top. Wipe the rims of the jars to remove any residue and seal them with the lids. Process the jars in a water bath for 5-10 minutes to ensure a good seal. This method helps preserve the jam for months, allowing you to enjoy it long after the fruit season has passed.
Storing Your Homemade Jam
Once your jam is canned and sealed, let the jars cool completely. Store the jars in a cool, dark place, like a pantry, where they can be kept for up to a year. After opening a jar, refrigerate it to keep it fresh. Always check the seal before storing—if the lid pops when pressed, it means the jar isn’t sealed properly, and you should refrigerate it immediately. If you find that you’ve made too much jam, you can also freeze it in freezer-safe containers for longer storage.
Troubleshooting Common Jam-Making Issues
Despite its simplicity, jam-making can sometimes present a few challenges. If your jam is too runny, you may not have cooked it long enough, or the fruit may have had too little pectin. If it’s too thick, you may have overcooked it or added too much pectin. Don’t worry! You can always reprocess the jam by adding more fruit or liquid and cooking it again. If your jam hasn’t set at all, try adding a bit more pectin and reheating it to the right temperature. Learning from each batch will help you perfect your technique.
Enjoying Your Homemade Jam
Once your jam is ready and properly sealed, it’s time to enjoy it! Use it as a spread on toast, a topping for yogurt, or mix it into desserts like cakes and pastries. Homemade jam can also be a thoughtful gift for friends and family. Experiment with different fruit combinations to create unique flavors that suit your taste. Don’t forget to savor the feeling of accomplishment that comes from creating something so simple yet satisfying.
Essential Equipment for Jam Making
- Large, heavy-bottomed pot
- Ladle for transferring hot jam
- Sterilized jars and lids
- Cold plate for testing consistency
- Wooden spoon for stirring
- Canning funnel for easy pouring
- Pectin (if necessary)
Watch Live Sports Now!
Dont miss a single moment of your favorite sports. Tune in to live matches, exclusive coverage, and expert analysis.
Start watching top-tier sports action now!
Watch NowCommon Jam-Making Fruits
- Strawberries
- Raspberries
- Blueberries
- Peaches
- Apples
- Blackberries
- Mangoes
Pro Tip: If you’re looking for a healthier alternative, you can reduce the sugar in your jam recipe by using natural sweeteners like honey or agave. You can also experiment with less processed options like maple syrup, but remember that this may slightly alter the flavor and consistency. Adding chia seeds is another great way to thicken your jam without using pectin, and it also boosts the nutritional content with extra fiber and omega-3s. Adjust the sweetness to suit your preferences while keeping the texture in mind.
| Ingredient | Function | Alternative |
|---|---|---|
| Sugar | Sweetens and preserves | Honey, Agave |
| Pectin | Helps jam set | Chia seeds, Apple cores |
| Fruit | Base flavor | Frozen fruit, Dried fruit |
“Making jam is not just about preserving fruit; it’s about capturing the essence of the season in a jar.”
Now that you know how to make jam, it’s time to try it yourself! Whether you choose a classic berry jam or something more adventurous, the possibilities are endless. Remember, every batch is a learning experience, so don’t be afraid to experiment. Share your jam-making journey with friends and family, and feel free to bookmark this guide for future reference. If you found this post helpful, be sure to share it on social media—let’s spread the joy of homemade jam!