Adding a signature to your emails in Outlook is an important way to personalize your communication, giving your messages a professional and polished look. It’s not only a space to include your name but also a place to share important contact details, such as your phone number, job title, or company name. Whether you’re sending professional emails or personal notes, having a signature ready to go makes your communication more efficient and visually appealing. Fortunately, Outlook makes it easy to set up and manage your email signatures, ensuring consistency across all of your emails. In this guide, we will show you how to create and add a signature in Outlook, so you can start sending emails with style and professionalism.
Why Add a Signature in Outlook?
Adding a signature in Outlook helps create a consistent and professional impression with every email you send. Consistency is key when communicating with clients, colleagues, or potential employers, and a signature gives your messages a polished finish. Beyond just your name, you can also include your title, company, phone number, or even a personal touch like a favorite quote. With the automatic inclusion of your signature in all outgoing messages, you save time and ensure you’re always presenting the same professional image. Creating a signature in Outlook is a simple process that can streamline your daily communication.
How to Create a Signature in Outlook
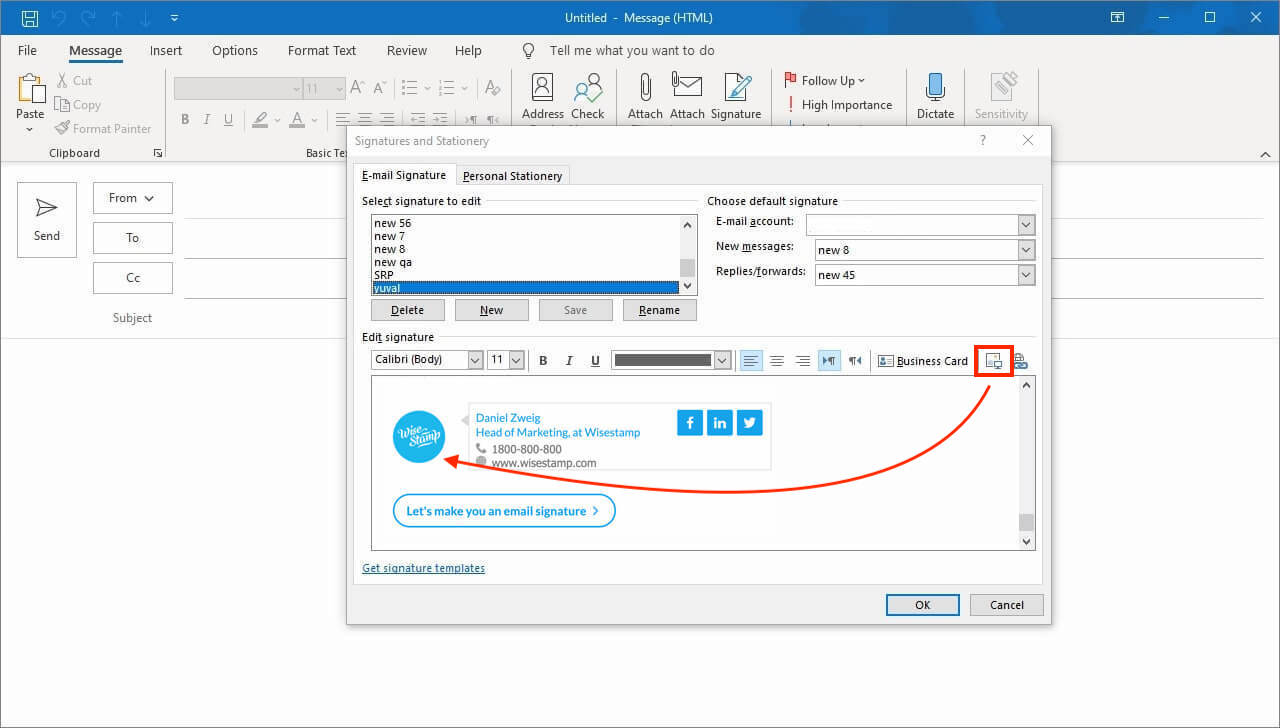
To create a signature in Outlook, start by opening the application and navigating to the "File" tab. From there, click on "Options" and select "Mail" from the list on the left. Then, click on the “Signatures” button to open the Signatures and Stationery window. You’ll see an option to create a new signature—simply click on it and give it a name. This is where you can type out your signature, adding details like your name, title, company, and contact information.
Formatting Your Signature in Outlook
Once you’ve created your signature, you can use various formatting options to make it visually appealing. Outlook offers a wide variety of formatting tools to adjust font style, size, and color. You can also add images like your company logo or a personal photo to make your signature more unique. Don’t forget to include a line break between each piece of information, as this will keep your signature neat and easy to read. Formatting your signature helps create a more professional impression and enhances readability.
Setting a Default Signature
After creating your signature, you can choose whether you want it to be the default for new emails and replies. In the Signatures and Stationery window, there is an option to set your signature as the default. Simply select your newly created signature in the dropdown menus for new messages and replies/forwards. This ensures that your signature will automatically appear in every email you send, without the need to manually add it each time. Setting a default signature saves time and ensures consistency across all emails.
Adding Multiple Signatures in Outlook
You can create multiple signatures in Outlook for different types of emails. For example, you might have one signature for professional emails, another for personal emails, and a third for emails that include special promotions or updates. Managing multiple signatures allows you to easily switch between them based on the context of the email. To switch signatures, simply go to the email compose window, click on "Signature," and choose the one you want to use. This flexibility makes it easy to tailor your message to different audiences while keeping your communication consistent.
Vote
Who is your all-time favorite president?
Troubleshooting Signature Issues
If your signature is not appearing automatically or not formatting as expected, there are a few troubleshooting steps you can take. First, make sure you’ve set your default signature correctly under "Signatures and Stationery." If the issue persists, check for any conflicting settings in your Outlook account, such as HTML settings or email forwarding options. Sometimes, Outlook settings may override your signature preferences, causing it not to appear in certain cases. Clearing out any old signatures and creating a new one may also help resolve these issues.
Using Images and Links in Your Signature
Many people like to include images and hyperlinks in their email signature to enhance the visual appeal or share additional information. Including a logo or social media links can increase the professionalism of your signature. Outlook allows you to add hyperlinks by selecting the text and using the "Insert Hyperlink" option, or by simply pasting the URL. Make sure the images you include are properly sized, as large images may distort your signature or affect the loading time of your email. Using links strategically ensures that your recipients can easily access your online profiles or business website.
Syncing Your Signature Across Devices
If you use multiple devices for your Outlook emails, such as a laptop, desktop, or mobile phone, it’s important to ensure that your signature is synced across all devices. Outlook on the web, the desktop app, and the mobile app all support signatures, but syncing them requires ensuring that the signature is set on each device. Manually update your signature settings on each device to keep them consistent. This is particularly useful if you’re switching between devices and need your signature to appear in the same format everywhere.
Advertisement
Signature Etiquette in Outlook
While creating a professional signature is essential, it’s also important to follow proper etiquette. Keep your signature concise and avoid overloading it with unnecessary information or flashy elements. Signature etiquette calls for keeping the tone of the signature appropriate to your audience, avoiding overly casual language or irrelevant details. Stick to the basics, such as your name, title, company, and necessary contact information. Don’t forget to check for typos, as a well-proofread signature reflects professionalism and attention to detail.
Managing Signature Updates
As your role or contact details change, you’ll want to update your signature to reflect those changes. Regularly updating your signature ensures that your emails are always current and accurate. Whether it’s a change in job title, phone number, or company logo, Outlook makes it easy to update your signature. Simply go to the "Signatures" section under "Options" and edit your existing signature. Keeping your signature up-to-date will ensure you always have a professional presence in your communications.
Tips for Creating an Effective Signature
- Keep your signature concise and focused.
- Use standard fonts and colors to maintain readability.
- Include essential contact information like phone numbers or email addresses.
- Avoid too many images or excessive text.
- Use professional language and avoid slang.
- Update your signature regularly to keep it current.
- Make sure to proofread for spelling or grammar errors.
Watch Live Sports Now!
Dont miss a single moment of your favorite sports. Tune in to live matches, exclusive coverage, and expert analysis.
Start watching top-tier sports action now!
Watch NowBest Practices for Signature Management
- Choose a signature that aligns with your professional or personal brand.
- Include relevant social media links or your business website.
- Test your signature on multiple devices to ensure compatibility.
- Use a mobile-friendly design if your signature is used across devices.
- Avoid clutter in your signature to make it more effective.
- Tailor your signature based on the audience you’re emailing.
- Set a default signature for new emails, replies, and forwards.
Pro Tip: Use a simple and professional design for your email signature. Keep it readable and avoid overloading it with too many elements, such as multiple images or long lists of contact details.
| Device | Sync Status | Action |
|---|---|---|
| Desktop | Updated | Ensure signature is active |
| Mobile | Not Updated | Manually update signature |
| Web | Updated | Verify synchronization |
“A well-crafted email signature is more than just a sign-off—it’s a reflection of your professionalism and attention to detail.”
Now that you know how to add, customize, and manage your signature in Outlook, take the time to update it and create a more polished, professional communication experience. Whether for business or personal use, a good email signature can set the right tone and leave a lasting impression. Don’t forget to keep your signature relevant and up-to-date to reflect any changes in your career or contact information. Share this guide with your colleagues or friends who might also benefit from a little email signature help. Remember to bookmark this page for future reference and continue making your emails stand out!